Showing posts with label Penny Black. Show all posts

Sunday, October 31, 2010

Happy Halloween!

Good Afternoon and Happy Halloween!

I'm so excited to get back to my Magnolia stamps! They are one of my true obsessions. Just look at that sweet little face!

This is "Lovely Tilda" from the Autumn/Fall Collection and she was a "must have" as soon as I saw her.


I've used some gorgeous paper from Teresa Collins called "Giving Thanks" and black and orange Bazzill card stock. The flowers are cut from the same Teresa Collins paper using one of the Tim Holtz flower dies and the May Arts Black stitched ribbon is one of my all time favorites!
She is all dressed up for Halloween in her little orange dress.
Here is a list of the Copic colors used: E0000, E00, YR14, Y38, Y32, E31, E25, E50 and 0.

My final Halloween project is another image from the "Be Very Scared" Penny Black stamp set. I didn't even get to ink up every image in that set...I guess there is always next Halloween.


The kitten and balloon are colored with Copic markers. I've matted the image with some black card stock and adhered it to an acetate box that is filled with Candy Corn.

Here is a side view of the project complete with candy corn!

Thanks so much for stopping by.
Have a great Halloween!

Julie

Saturday, October 30, 2010

Penny Black Halloween

Hello Again!

I'm back again with three Halloween cards that are all made using the Penny Black Transparent stamp set called "Be Very Scared". This is such a great collection of images because every single image is absolutely adorable! Just take a peek at these little cuties!

First is the Kitty in the Pumpkin:
I've used White, Black and Orange Bazzill card stock, my large Marvy circle punches, the Cuttlebug Divine Swirls embossing folder, a white gel pen and my Copic markers. This is such an adorable little kitten:-)


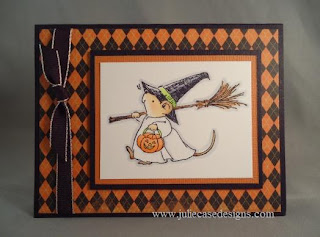
Second is the Mouse with the Broomstick:
I must admit that I bought the stamp set for this image alone, but instantly realized that I liked every image in the set. I've used some Reminisce Halloween Argyle paper, Black & Orange card stock, Black May Arts ribbon and my Copic markers to color the image.


And the third image is the Vampire Kitty!
He's super easy to color with Copic markers because his cape is already stamped black. I found this beautiful candy corn paper from K&Company and paired it with the same Black and Orange Bazzill card stock I've used on the other cards. I've airbrushed a soft background on my white card stock using the Copic airbrush system.


The "Trick or Treat" sentiment stamp is from a separate Penny Black transparent stamp set called "Trick or Treat". I think that little spider hanging from the word "Trick" adds just the perfect touch.

Thanks again for popping by. I'll be back tomorrow with a final couple of Halloween projects!

Julie

Sunday, March 7, 2010

Daisy Bunnies

Good Evening!

With Spring just around the corner, I'm sharing a card tonight using a super sweet Penny Black stamp called "Daisy Bunnies". Aren't they just adorable little bunnies? I'm such a fan of Penny Black stamps and I adore all of their little bunnies and bears. And as a bonus, the wood-mounted stamps have colored images on the back side of the block. It's a great guide to follow when coloring their images. The card stock is Bazzill and the lovely plaid paper is an older print from BoBunny called "Pep Rally Plaid". The Olive satin ribbon is May Arts.

I'm teaching some Copic card classes at a fabulous scrapbook store called The Scrapbook Page located in Shawnee Kansas. This is one of our March cards which uses some feathering strokes for blending colors. I'll be sharing some other class samples in the very near future. You can check out the website for the Scrapbook Page here.

These little bunnies are colored with Copic markers...which are my new addiction!!
Here are the colors: R20, Y11, C1, E50, E31, E33, E35 and 0

Thanks so much for stopping by and following my blog!!
Julie

Friday, February 26, 2010

Penny Black Bees & Bunny

Don't ya just love this bunny in a flower pot with the little bees buzzing around the flower? I saw this stamp and knew that it just had to come home with me. Of course, I'm a huge fan of Penny Black stamps so it's no surprise that I bought this one!! And...we have an adorable little white rabbit of our very own, so I'm partial to bunnies!!

It's a double post day today!! The challenge ends tomorrow so I need to post the card tonight!I've created this card for the Week 89 Penny Black Saturday Challenge which uses the color combo Pink, Green and Yellow along with a Penny Black image. I had this beautiful paper from October Afternoon which totally fit the color combo and paired it with some Ruby and Yellow Bazzill card stock and Regal Rose Stampin' Up ribbon.

I even grabbed my new SU Scalloped Trim border and corner punches. They are a little tricky to use, but I think it was worth the effort. I love the scalloped frames that can be made with these punches.

These little bees & bunny are colored with Copics:
YG03, YG67: Grass
Booo: Bee wings
R20: flower petals, flower pot
Y15, Y38: Bees
E31, E33, E35, E50: Bunny and Flower pot

I've added a little Doodlebug Sugarcoated glitter to the wings but that may be difficult to see in the picture.

Thanks again for buzzing by!
Julie

Monday, February 15, 2010

One last Valentine card

OK...I know it's February 15th, but I just found a fun challenge over at the Penny Black Saturday Challenge blog. This challenge is simply to create a valentine card using any Penny Black stamp. I have never participated in a challenge before - but since my stash of Penny Black stamps is growing quite quickly, I thought it would be fun to join in. Just maybe...I'll even figure out how to use all of the links!!

This card uses two stamps from Penny Black "Via Post" and "Be My Valentine". I've used some Pink Paislee paper from their new Cupid Collection - one of my favorites!!! The image is colored with Copic markers.

...And of course you'll see that I've sewn the edges with my sewing machine. I really love the look of the sewn layers!!

Thanks for stopping by and I hope you had a wonderful Valentine's Day.

Julie

Friday, February 12, 2010

Valentine Box of Chocolates

Good Evening!
With Valentine's Day just around the corner, I want to share one last Penny Black Valentine bear. Isn't he a sweet little guy holding his box of chocolates? The name of the stamp is "Tender Hearts" and the sentiment is also from Penny Black stamps. The striped paper is "Love Bandit Stripe" from BoBunny...love the paper and the name!
He's colored with Copic markers and tied with some pretty two-toned pink satin ribbon.

Thanks for stopping by and have a great evening!
Julie

Saturday, February 6, 2010

Valentine Bear


Good evening!
Here's another Valentine bear! I bought 4 different bears made by Penny Black and I'm having such fun coloring with my Copic markers. I've used another paper from Pink Paislee and the striped pattern is actually the reverse side of the hearts. You can expect a few more valentines to come over the next few days... I'm obsessed!
Thanks for stopping by!
Julie

Wednesday, February 3, 2010

Penny Black Valentine Bear

Good Evening and Happy February!
Isn't this little bear adorable? Both the Bear and the sentiment stamps are from Penny Black. You may see this little guy showing up in numerous projects over the next few days!
The patterned paper is "Hearts Bloom" from Pink Paislee's Cupid Collection and every design in this line is absolutely gorgeous!
The bear is colored with Copic markers:
C1, Y11, R20, R35, B000, E31, E33 and 0-Colorless blender.

Thanks so much for stopping by.
Julie

Monday, January 25, 2010

Brrr...it's cold outside!

Good Evening!
The wind is howling outside tonight and we even have a few snow flurries. It's the perfect night for a snowman card.
I took a Copic Certification class in Minneapolis last Fall taught by Marianne Walker and I've been hooked on COPICS ever since. I just have to say that I LOVE these markers.
I've used this cute little Penny Black Snowman stamp called "warm & cold" and colored him with my Copic markers. After the image was completely colored, I masked the snowman and airbrushed a light blue background using the airbrush tool. Not a lot of color blending on this little guy. This one's a quick and easy card!

Thanks for stopping by!
Julie