Showing posts with label Halloween. Show all posts

Sunday, October 31, 2010

Happy Halloween!

Good Afternoon and Happy Halloween!

I'm so excited to get back to my Magnolia stamps! They are one of my true obsessions. Just look at that sweet little face!

This is "Lovely Tilda" from the Autumn/Fall Collection and she was a "must have" as soon as I saw her.


I've used some gorgeous paper from Teresa Collins called "Giving Thanks" and black and orange Bazzill card stock. The flowers are cut from the same Teresa Collins paper using one of the Tim Holtz flower dies and the May Arts Black stitched ribbon is one of my all time favorites!
She is all dressed up for Halloween in her little orange dress.
Here is a list of the Copic colors used: E0000, E00, YR14, Y38, Y32, E31, E25, E50 and 0.

My final Halloween project is another image from the "Be Very Scared" Penny Black stamp set. I didn't even get to ink up every image in that set...I guess there is always next Halloween.


The kitten and balloon are colored with Copic markers. I've matted the image with some black card stock and adhered it to an acetate box that is filled with Candy Corn.

Here is a side view of the project complete with candy corn!

Thanks so much for stopping by.
Have a great Halloween!

Julie

Saturday, October 30, 2010

Penny Black Halloween

Hello Again!

I'm back again with three Halloween cards that are all made using the Penny Black Transparent stamp set called "Be Very Scared". This is such a great collection of images because every single image is absolutely adorable! Just take a peek at these little cuties!

First is the Kitty in the Pumpkin:
I've used White, Black and Orange Bazzill card stock, my large Marvy circle punches, the Cuttlebug Divine Swirls embossing folder, a white gel pen and my Copic markers. This is such an adorable little kitten:-)


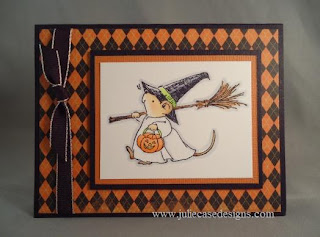
Second is the Mouse with the Broomstick:
I must admit that I bought the stamp set for this image alone, but instantly realized that I liked every image in the set. I've used some Reminisce Halloween Argyle paper, Black & Orange card stock, Black May Arts ribbon and my Copic markers to color the image.


And the third image is the Vampire Kitty!
He's super easy to color with Copic markers because his cape is already stamped black. I found this beautiful candy corn paper from K&Company and paired it with the same Black and Orange Bazzill card stock I've used on the other cards. I've airbrushed a soft background on my white card stock using the Copic airbrush system.


The "Trick or Treat" sentiment stamp is from a separate Penny Black transparent stamp set called "Trick or Treat". I think that little spider hanging from the word "Trick" adds just the perfect touch.

Thanks again for popping by. I'll be back tomorrow with a final couple of Halloween projects!

Julie

Witches Shoes

Good Morning and Happy Almost Halloween!

It is such a gorgeous Fall day. I'm hoping that the weather holds for all of those little Trick-or-Treaters that will be out tomorrow evening.


I really love this stamp from Stampendous called "Witches Shoes". It's sweet and simple and so easy to color. The orange paper is in the first card is by Echo Park. The dotted green paper used in the second card is from the "Booville" line by Little Yellow Bicycle.

The "Trick or Treat" sentiment is from a Penny Black stamp set. You may notice the tiny spider hanging from this sentiment. I popped a tiny black gem on top of the stamped spider. Just gotta love that itsy bitsy spider!

Thanks so much for stopping by!
Julie

Friday, October 29, 2010

Give Me Your Candy...or Else

I'm Back....Just in time for Halloween!


It's been so long since I've posted anything...and now Halloween is just a few days away.

I couldn't let Halloween pass by without posting a few new projects on my much-neglected BLOG so I grabbed my camera and a few of the Halloween projects I've been working on and headed over to my little photo cube.

I'm starting tonight with a couple of sweet little Halloween treats.

This adorable little Vampire image is from Stampendous. He is colored with Copics and adhered to a small treat holder that is just the right size for a snack-sized package of M&M's. Here's a side view with the M&M package nestled safely inside.


The paper is from the "Booville" collection by Little Yellow Bicycle. The BAT trim at the top of the treat is a Black Satin trim from May Arts. I've used it here to decorate the top of the bag as well as hide the small staple that is holding my treat closed.

The treat bag is made from a strip of paper measuring 3x12; then scored at 4 1/2, 6 1/2 and 11. As you fold the top 1" flap over the top, you can simply staple the treat closed.

And here are the Copic Colors: C7, C5, C3, YG01, YG03, E0000, E00, YR04, Y38

Thanks so much for stopping by!
Julie

Saturday, January 23, 2010

Pumpkin Poop


Here is my 2008 version of Pumpkin Poop along with a beautiful wooden pumpkin painted years ago by my Mom. Isn't she talented!! I used the Top Note die with my Big Shot for the bag topper...that's a quick and easy treat.
Stampin' Up! Supplies:
CS: Pumpkin Pie, Whisper White, Basic Black
Stamps: Halloween Frights
Ink: Pumpkin Pie
Accessories: Top Note Die, Old Olive 1/4" Grosgrain, 1" and 3/4" circle punches, small cello bags

Baskets of Eyeballs


Greetings!
Another quick post to show these baskets made with my Big Shot. I used my Baskets and Blooms die and cut two of the baskets from designer paper. The third basket is cut from Basic Black card stock and then embossed with silver embossing powder. No basket would be complete without chocolate, so I added the wrapped chocolate eyeballs. The eyes kind of look like they are peering right up out of the basket! Creepy...but cute!!
Supplies:
Paper: Ghostly Greetings Designer Paper, Basic Black CS
Stamp set: Tasty Sweet
Accessories: Baskets & Blooms XL Die-cut, Assorted Ribbon, Chocolates!!

M&M Monsters


Greetings!
These sweet little treats are just the right size to hold the small individual bags of M&M's or Skittles.
The "mouth" is punched using a 1 3/8" circle punch to show the candies hiding inside. A single staple seals the treats and a ribbon can be attached at the same time using the same staple. Super Quick and Easy!!
All Supplies Stampin' Up!
Paper: Basic Black, Whisper White, Ghostly Greetings Designer Paper
Dimensions: Black CS measures 3x11, then scored at 4, 6 and 10; designer paper is 2 3/4 x 3"
Accessories: White Gel Pen, Assorted Ribbons, Circle Punches - 1 3/8", 1" and 1/2", Stapler
Happy Halloween!!

Frankenstein Treats


Good Morning!
Here's a sample of the Frankenstein treats we've made during clubs, classes and workshops. The box with the wire handle can hold lots of Halloween treats and the candy bar wrapper fits the normal 1.55 ounce Hershey bar. Frankenstein's hair is made using a Grass Border die. This long die works perfectly for those of us who don't wat to give Frank a haircut using scissors!!
Stampin' Up! Supplies Used:
Stamp Set: Smarty Pants
Cardstock: Basic Black, Old Olive, Whisper White
Ink: Basic Black
Accessories: Black Marker, White Gel Pen, 1" and 3/4" circle punches

Scalloped Spider Treats


I absolutely love punch art! I posted these little scalloped spiders on Splitcoaststampers in October of 2008.
The spiders are made using Stampin' Up! punches: Two Scalloped cirle punches for his body, 1/2" and 1/4" circle for his eyes, 1/4" circle for his nose, and the layered Photo Corners punch for his legs. With a peppermint patty sandwiched between the two scallop punches, these little critters can stand up all on their own.
More Halloween projects to come!